

What Is A Good Thing To Put Over Door To Stop Rain Dripping
Fitting a Weatherboard – How to Fit a Weatherboard to an External Door to Prevent Leaks and Damp Damage to Timber Doors
Advice on how to fit a weatherboard to protect your external door. By fitting a weatherboard you can prevent rain water from leaking through the base of your door around the bottom of the frame and causing clammy and wet issues in your property. They also help to protect the base of timbers doors that can rot out over fourth dimension if subjected to water and moisture. Find out what a weatherboard is and how to fit a weatherboard to a door.
Most of us these days take it for granted that, once the forepart door of your house, flat, barn conversion or wherever you call home is airtight, so you are totally sealed and weather proof.
Depending on the blazon of front door you have, this may non necessarily be the case every bit if you do not have a weatherboard fitted to your door then you lot may be allowing water and moisture to creep in nether the door itself.
If you have a mod uPVC or blended door then more often than not you are pretty safe. Most of these types of door will characteristic an integral seal built into the door itself that will prevent whatever form of moisture from entering the property, but, overtime, these seals volition themselves shrink and deteriorate increasing the chances of damp getting in.
If you, as nosotros do, alive in the UK you lot volition be well used to the "slightly clammy" climate that we live in and due to this volition well-nigh probaly be well versed in spotting and fixing the various routes that water can take to detect it's way into your home.
To these ends, in this projection we are going to take a look at how to fit a weatherboard (rain deflector, drip bead, weather bar as they tin sometimes also be called) and how these marvelous contraptions prevent water ingress through the bases of exterior doors.
What is a Weatherboard?
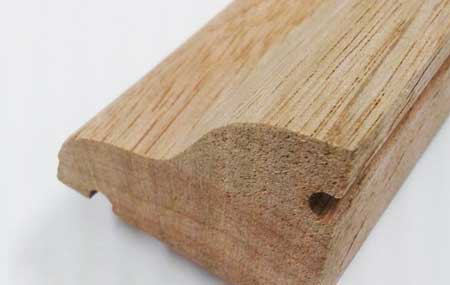
Substantially a door weatherboard is an angled or beveled piece of timber, metal or rigid plastic that is fixed to the bottom of an exterior door that fits betwixt the door jambs (or stiles as they are also known).

Weatherboard fixed to door
They are most commonly found on timber doors and their primary purpose is to stop h2o from running down the face of the door itself and reaching the often unprotected underside where it can so soak in to the timber and over time rot information technology out.
It's other purpose aside class protecting the doors underside, is to stop h2o from entering into a property through whatever gaps betwixt the door itself and whatever may be below information technology. This could be a floor, base of a door frame, doorsill or threshold etc….
Every bit you may notice in the image below, in the base of the weather condition strip or drip bead there is a slight recess. The chief part of this is to forbid whatsoever water or drips tracking backwards.
Once it reaches the recess, information technology and then simply drops downwardly to the flooring well clear of the door itself.
Some manufacturers will too fit a rubber strip to this recess that, once the door is closed, creates a seal between the base of the door and the floor, frame or threshold, that provides a further barrier.
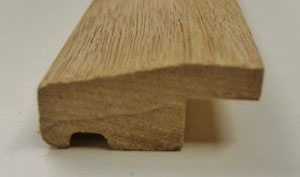
Recess in base of weatherboard
Equally we have mentioned already, if yous have a uPVC door or indeed a composite door and then in some cases it may not be necessary to have a weatherboard fitted (although most doors of this type come with one already fitted).
This is due to the fact that near doors of this type are fitted within a frame that contains the entire door within it.
Sealed into the border of the frame is a spongy rubber seal that, when the door is airtight, seals whatsoever gap betwixt the door and the frame and creates an bulletproof barrier preventing any possibility of water getting in.
Rubber seal in the frame of a uPVC door
Despite this, well-nigh uPVC plastic and composite doors are supplied with a weatherboard for good do as they also stop any buildup of water along the seal at the base that can collect and when the door is opened, then spills in.
For some odd reason, hardwood and timber outside doors very rarely come fitted with a weather strip or board, even though the weatherboard itself is mainly geared towards preventing water ingress and damage on exactly these types of doors.
Possibly this is due to the fact that you may demand to cut the door to fit, but that'south a question for another day.
With the above in mind, if you have a timber door, yous will need to purchase your own.
If yous have ever seen a stable door (door that'due south divide in the heart and both pinnacle and bottom tin be opened or airtight) then you lot may as well accept noticed that there is often a weatherboard fitted to the base of the pinnacle section of door as well as the base of operations of the bottom one.
For the same reason that at that place is 1 at the base, this does exactly the aforementioned job – stops water from entering through the gap between the ii section of door.
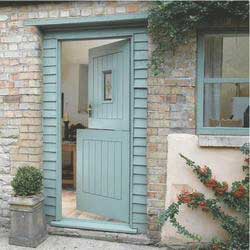
Stable door without weatherboard
Stable door without weatherboard
When sourcing a weatherboard for your door, make sure that the one y'all go for is exactly that; purpose made for precisely this task and shaped in such a way equally to direct any water running down the face of the door away.
A hardwood weatherboard will last a lot longer than softwood, but if your door is made of pino at that place's not much point in fitting a hardwood one that will likely outlast the door itself!
As to where to go one, any decent DIY store or builders merchant should stock a pick of different styles and material types.
Types and Styles of Weatherboard
In terms of style, all weatherboards are of a similar blueprint, substantially as the lip itself ensures that the water is directed away from the face of the door.
Despite the standard design, they exercise however come up in a range of unlike materials:
Timber – Hardwood or Softwood
If you have a timber (either hardwood or softwood) front door then in nearly cases you will desire to go for a timber weatherboard to friction match.
If you employ a visitor to fit a new door for you then in nearly cases they will offer the option to take one fitted during installation or you can indeed fit 1 yourself (meet below for didactics).
As mentioned, nigh builders merchants and DIY stores will stock a range so they should exist readily available.
Equally you can see in the prototype below, this particular example has a baste recess on both flat edges and you will find that about examples exercise. This simply means that it is reversible and can exist fitted either way around.
Reversible timber weatherboard – Image courtesy of doorweb.co.u.k.
Ane last signal to make concerns the type of timber used in construction. If possible, ever get for a strip fabricated of hardwood as opposed to softwood as it volition last much longer.
Plastic uPVC or Blended
As with the above, upvc atmospheric condition strips are all of a like pattern and shape, the only real differences come in their end and construction material and the way in which they are fastened to the door.
In respect to their structure firstly, in almost all cases they will either be made of straight uPVC plastic or a mixture of uPVC and coated with GRP.
When information technology comes to fixing to a door at that place are a few different methods. If you lot are fixing one to an existing door then most probably it will come up as two pieces; the weatherboard itself and a mounting subclass.
The mounting bracket volition simply exist screwed to the door and and then the weatherboard simply slots on to the subclass and is usually secured via a screw or clip.
If you are having a new door fitted with a supplied atmospheric condition strip and so in most cases the bracket part will exist moulded/included as part of the door and the strip itself will over again just slot over.
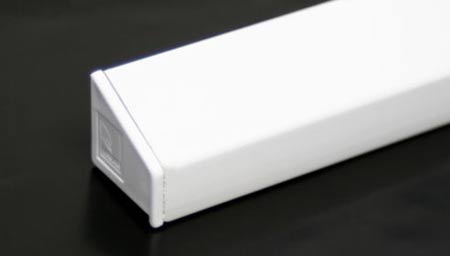
UPVC door weatherboard
Aluminium or Steel
As with the uPVC variant above, this type will too generally come up as a ii-role slice, with the bracket being fixed to the door and then the strip slotting over it or they can also come up equally a one-piece unit that is then screwed to the door.
When it comes to styles, the slot-and-bracket type will look like the standard lip-type as seen in the timber and uPVC variants above simply the all-in-one type can look slightly different in that it appears to have two lips.
This is mainly down to the fixing, equally access is needed along the entire length to ensure it can be secured in firmly. The acme lip then directs water outwards over the 2d lip that protects the base.
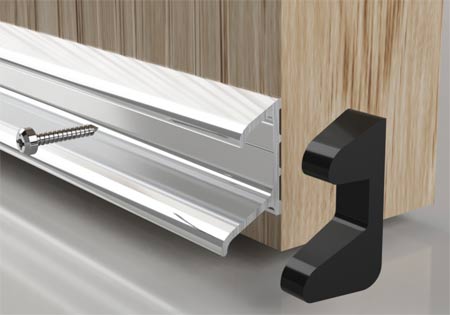
Aluminium weatherboard – Image courtesy of stormguard.co.uk
How to Fit a Weatherboard to a Door
For the sake of this project we are going to run through the procedure of fitting a timber weatherboard. Nonetheless, the principles of fitting other types is pretty much the same.
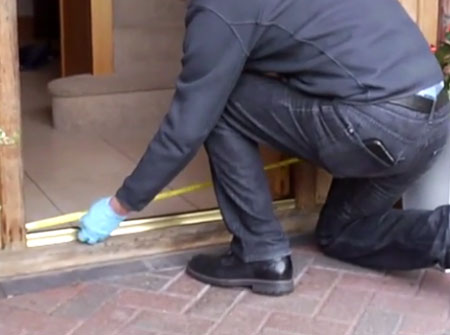
1. Measure and Cut to Fit
As pretty much all front external doors open in (to prevent you lot opening a door a door in someone's face), shut the door making sure it is fully shut.
Now, measure the distance betwixt the door frame uprights or stiles and make a note of this number. This is the width that you lot are going to need to cutting your weatherboard to.
Brand certain your measurement is authentic and volition course a nice snug fit as if there are any gaps, water is certain to find its fashion in.
In pretty much all cases, you lot are going to need to cutting your weatherboard to size as information technology will come in lengths of effectually ane metre.
Before cutting to right length, on i cease, cutting a slight mitre of effectually 15-xx° from the back to the front end e.g. the front existence narrower than the back (the mitre angle ensures the weatherboard won't hit the door frame as the door is opened and airtight).
Now, measure and mark your cutting point along the back edge (not the front border with the mitre) and so make your cut at the point you marked.
Pay attention to where you fabricated the marking due east.yard. is it directly on the cut point, or to the left or right? Make certain you're cutting in the right place!
Cut the weatherboard to length and again, cut a mitre of the same angle equally the opposing finish.
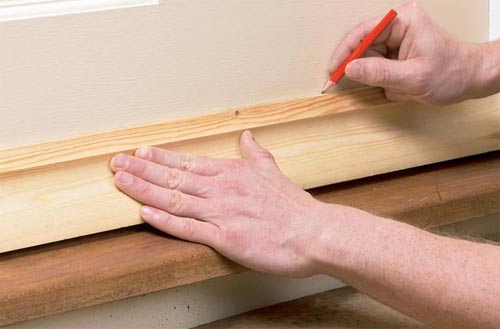
Measure the width of the door frame
2. Test Fit and Marker Fixings
Earlier yous actually fix your weatherboard to the door, you need to do a test fit to make sure all is well and the fitment is correct.
With the board positioned as far down equally possible, but not touching the sill and leveled (use a spirit level for this), depict a line on the door along the top edge of the board. Again, make sure this line is level every bit this marks your final fixing point.
To ensure information technology stays level whilst making your mark, information technology's a good idea to get a second pair of hands to help you lot.
Finally, mark the fixing positions on the front of the board. 3 fixings should be enough to hold information technology firmly.
Marker fixings at either end around 30mm in from each end and then one in the center. Use a tape measure to marker these points accurately.
Once marked, remove the weather strip and place on a firm surface or work bench. Drill out your fixing points and so countersink the holes (tips on how to drill pilot holes and countersink tin be establish here) every bit we are going to make full over the fixings at the cease.
Mark a line on the door where weatherboard will be fitted
3. Stain or Prime number and Undercoat
Earlier fitting information technology's a good idea to fully stain or prime and undercoat the unabridged strip as this will provide total weather protection and ensure it lasts for a good long while.
Before calculation your called protective coating, give it a light rub over first using 240+ dust sandpaper to take off any crude edges and likewise to provide a decent key to your concluding finishing'due south.
If staining, apply your start glaze over the entire object, making sure you fully encompass whatever nooks or crannies and then allow to dry for manufacturers recommended time earlier applying any 2nd or third coats.
If priming/undercoating, use your primer making certain yous are using the correct blazon so permit to dry before applying your primer. Check with the manufacturers instructions every bit to whether you need to apply one or ii coats.
Once primer and undercoats are dry, employ your finishing coat. Ordinarily this will be a colour lucifer to the finish of your existing door, but this is actually downwards to you.
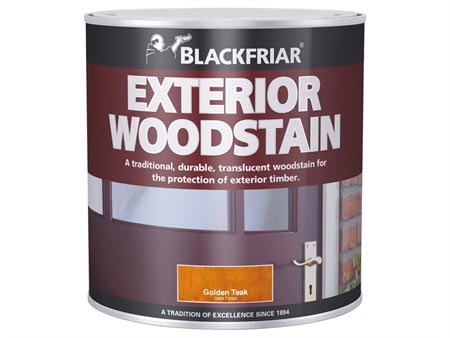
Outside woodstain – Available from our online shop here
four. Gear up it in Identify
Position the weatherboard back against the door, lining it up against the line yous drew earlier. Spiral the lath into place, making sure it stays level.
Once stock-still, endeavour opening and closing the door to make sure that the weatherboard doesn't catch against the doorframe or anywhere else.
In the hopefully unlikely event that information technology does, use a plane or sandpaper on the part that catches until it doesn't touch any more.
Screw the weatherboard to the door – Image courtesy of diynetwork.com
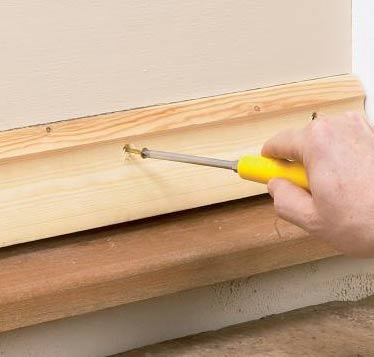
five. Seal up any Gaps and End up
With everything at present fixed securely in place and the door opening and closing as it should it's time to utilize your final finish.
Using a suitable exterior wood filler, fill up over your countersunk screws making sure you push button the filler in fully. If y'all can find 1 that's a close match colour to the final colour you're going, that's best as if you are staining then the stain volition not soak in fully and they volition ever prove slightly.
Leave the filler to dry fully as recommended by the manufacturer and then rub each indicate down until it's flush and smooth.
Apply a finishing glaze over the fixings and whatever other areas that take been rubbed downward and as before, once this has dried utilize a second and third coat if needed.
Once the final finishes have dried, the final job is to run a seal of silicone or other sealant along the top edge where the board meets the door. This is to prevent any risk of whatever water seeping in.
If y'all need whatsoever communication on using sealant and a sealant applicator gun, see our project here.

Brummer exterior wood filler
As you tin can see from the steps above, the principals can easily exist applied to the other types of weatherboard.

What Is A Good Thing To Put Over Door To Stop Rain Dripping,
Source: https://www.diydoctor.org.uk/projects/weatherboard.htm
Posted by: hinesableatifes69.blogspot.com
0 Response to "What Is A Good Thing To Put Over Door To Stop Rain Dripping"
Post a Comment