

How To Put A Powerpoint On A Usb
You tin create a package for your presentation and relieve it to a CD or USB drive so that other people can watch your presentation on most whatsoever figurer. Making a bundle ensures that all external elements of the presentation, such as fonts and linked files, are transferred to the disk or wink bulldoze. This is also called "publishing a presentation to a file."
Save your package to a CD
-
Insert a bare recordable CD (CD-R), a blank rewritable CD (CD-RW), or a CD-RW (that contains existing content that can be overwritten) in the disk drive.
-
In PowerPoint, click File, click Export, click Bundle Presentation for CD, and so click Packet for CD.
-
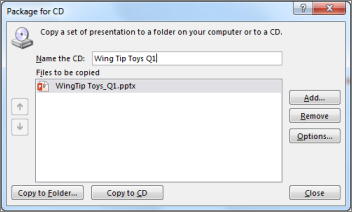
In the Package for CD dialog box, type a proper noun for your CD in the Name the CD box.
-
To add ane or more presentations to package together, click Add, select the presentation, and so click Add together. Repeat this step for each presentation that you want to add.
Tip:If you add together more than one presentation, they'll play in the guild in which they are listed in the Files to be copied list. Use the arrow buttons on the left side of the dialog box to re-society the list of presentations.
-
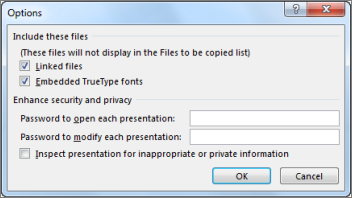
To include supplementary files such as TrueType fonts or linked files, click Options.
-
Under Include these files, select the applicative bank check boxes:
To audit your presentation for hidden data and personal information, select the Inspect presentation for inappropriate or private information check box.
-
Click OK to close the Options dialog box.
-
In the Package for CD dialog box, click Copy to CD.
Save your package to a USB wink drive
-
Insert a USB wink drive in a USB slot in your estimator.
-
In PowerPoint, click File, click Export, click Package Presentation for CD, and and so click Parcel for CD.
-
In the Package for CD dialog box, type a name for your CD in the Proper noun the CD box.
-
To add one or more presentations to packet together, click Add, select the presentation, and then click Add. Echo this step for each presentation that you want to add.
Tip:If y'all add more than one presentation, they'll play in the order in which they are listed in the Files to be copied list. Utilize the arrow buttons on the left side of the dialog box to re-guild the list of presentations.
-
To include supplementary files such equally TrueType fonts or linked files, click Options.
-
Under Include these files, select the applicative bank check boxes:
To inspect your presentation for subconscious data and personal information, select the Inspect presentation for inappropriate or private information check box.
-
Click OK to close the Options dialog box.
-
In the Package for CD dialog box, click Copy to Binder.
-
In the Copy to Folder dialog box, select Scan.
-
In the Choose Location dialog box, navigate to your USB wink bulldoze, select it or a subfolder in it, and so click Select.
The folder and path you chose are added to the Location box in the Re-create to Binder dialog box.
-
PowerPoint asks yous a question regarding linked files. It is best to answer Yes to ensure that all necessary files for the presentation are included in the package that is saved to the USB wink drive.
PowerPoint begins copying files, and when it is done information technology opens a window showing the complete package on the USB flash bulldoze.
Save your package to a CD
-
Open the presentation that you want to copy, or, if yous are working with a new presentation that has not been saved, save the presentation.
-
If you lot desire to salve your presentation to a CD, rather than to a network or to a local disk drive on your reckoner, insert a CD into the CD drive.
Notes:
-
You lot tin copy to a blank recordable CD (CD-R), a bare rewritable CD (CD-RW), or a CD-RW that contains existing content that can exist overwritten.
-
In PowerPoint, if you copy your presentation to a CD, make sure that yous copy all of the files in a single operation. Later the first set of files is copied, you cannot add any more files to the disc by using PowerPoint. Nevertheless, you tin utilize Windows Explorer to re-create additional files to a CD-R or CD-RW that contains existing files. Run across Windows Assist for more details.
-
-
Click the File tab.
-
Click Salve & Send, click Package Presentation for CD, so in the correct pane, click Package for CD.
-
To cull the presentations that you want to copy and the order in which you want them to play, do the post-obit:
-
To add together a presentation, in the Package for CD dialog box, click Add together, and then in the Add together Files dialog box, select the presentation that you want to add together and click Add together. Repeat this step for each presentation that yous want to add. Echo this step also if y'all want to add other related, not-PowerPoint files to the package.
Note:The presentation that is currently open automatically appears in the Files to be copied list. Files that you linked to the presentation are included automatically, but they do non appear in the Files to be copied list.
-
If you lot add more than i presentation, the presentations will appear on a Web folio that lets you navigate to the contents of the CD in the social club in which they are listed in the Files to be copied list in the Package for CD dialog box. To modify the order, select a presentation that y'all desire to movement, and and then click the pointer buttons to motion the presentation up or down in the listing.
-
To remove a presentation or file from the Files to be copied listing, select the presentation or file, and and then click Remove.
-
-
Click Options, so under Include these files, do ane or both of the following:
-
To ensure that files that are linked to your presentation are included in the package, select the Linked files check box. Files that are linked to your presentation can include Microsoft Office Excel worksheets that are linked to charts, sound files, motion-picture show clips, and more.
-
To use embedded TrueType fonts, select the Embedded TrueType fonts bank check box.
Notes:
-
If your presentation does not currently include embedded fonts, checking the Embedded TrueType fonts check box includes the fonts when packaged. The Embedded TrueType fonts check box applies to all presentations that are copied, including linked ones.
-
If your presentation already includes embedded fonts, PowerPoint automatically honors the setting of the presentation to include the embedded fonts.
-
-
-
To crave other users to supply a password before they can open up or edit any of the copied presentations, under Raise security and privacy, type the password or passwords that yous desire to crave to open up the presentation, edit it, or both.
Passwords use to .pptx, .ppt, .potx, .pot, .ppsx, .pps, .pptm, .ppa, .ppam, .mhtml, and .mht files that accept been converted to .ppt files, in the copied presentations. If any of the files that you copy already have passwords assigned to them, PowerPoint prompts you to choose betwixt keeping the previously assigned passwords for those files and overriding them with the new passwords. If you cull to override the previously assigned passwords, they are no longer accepted for the copied versions of the files. Notwithstanding, they are even so accustomed for the original versions.
-
To inspect your presentation for subconscious data and personal information, select the Inspect presentation for inappropriate or private information check box.
-
Click OK to close the Options dialog box.
-
Exercise i of the post-obit:
-
If you are copying your presentation to a network or to a local disk drive on your computer, click Copy to Folder, enter a binder name and location, and so click OK.
-
If you are copying your presentation to a CD, click Copy to CD.
-
Salve your package to a USB flash drive
-
Open the presentation that you want to re-create, or, if you are working with a new presentation that has not been saved, save the presentation.
-
Insert a USB flash drive into a USB port of the computer.
-
Click the File tab.
-
Click Salve & Send, click Package Presentation for CD, and then in the right pane, click Parcel for CD.
-
To choose the presentations that you want to copy and the gild in which yous want them to play, exercise the post-obit:
-
To add together a presentation, in the Bundle for CD dialog box, click Add, and then in the Add together Files dialog box, select the presentation that yous desire to add and click Add. Echo this footstep for each presentation that you want to add. Repeat this stride besides if you desire to add other related, non-PowerPoint files to the package.
Note:The presentation that is currently open automatically appears in the Files to be copied list. Files that you linked to the presentation are included automatically, but they do not appear in the Files to be copied listing.
-
If you add more than than i presentation, the presentations will announced on a Web page that lets you navigate to the contents of the CD in the order in which they are listed in the Files to be copied list in the Package for CD dialog box. To change the gild, select a presentation that you want to move, and and so click the arrow buttons to motility the presentation up or downwards in the listing.
-
To remove a presentation or file from the Files to exist copied list, select the presentation or file, and so click Remove.
-
-
Click Options, and then under Include these files, practice one or both of the following:
-
To ensure that files that are linked to your presentation are included in the bundle, select the Linked files check box. Files that are linked to your presentation can include Microsoft Office Excel worksheets that are linked to charts, sound files, moving picture clips, and more.
-
To employ embedded TrueType fonts, select the Embedded TrueType fonts check box.
Notes:
-
If your presentation does non currently include embedded fonts, checking the Embedded TrueType fonts check box includes the fonts when packaged. The Embedded TrueType fonts bank check box applies to all presentations that are copied, including linked ones.
-
If your presentation already includes embedded fonts, PowerPoint automatically honors the setting of the presentation to include the embedded fonts.
-
-
-
To crave other users to supply a password earlier they can open or edit whatsoever of the copied presentations, under Enhance security and privacy, type the password or passwords that you lot want to require to open the presentation, edit it, or both.
Passwords utilise to .pptx, .ppt, .potx, .pot, .ppsx, .pps, .pptm, .ppa, .ppam, .mhtml, and .mht files that accept been converted to .ppt files, in the copied presentations. If any of the files that you copy already take passwords assigned to them, PowerPoint prompts you lot to choose between keeping the previously assigned passwords for those files and overriding them with the new passwords. If you choose to override the previously assigned passwords, they are no longer accustomed for the copied versions of the files. Nevertheless, they are nonetheless accepted for the original versions.
-
To audit your presentation for subconscious data and personal information, select the Audit presentation for inappropriate or private information check box.
-
Click OK to close the Options dialog box.
-
In the Package for CD dialog box, click Re-create to Folder.
-
In the Re-create to Folder dialog box, select Scan.
-
In the Choose Location dialog box, navigate to your USB wink drive, select it or a subfolder in it, and then click Select.
The folder and path you chose are added to the Location box in the Copy to Folder dialog box.
-
PowerPoint asks you a question regarding linked files. It is all-time to answer Yes to ensure that all necessary files for the presentation are included in the package that is saved to the USB flash drive.
PowerPoint begins copying files, and when it is done it opens a window showing the complete package on the USB flash drive.
PowerPoint for macOS doesn't offer a "parcel presentation for CD" feature.
In PowerPoint for macOS, all content is embedded by default. So if you insert a sound, picture, or video, a copy of that media file is included within the PowerPoint file. The "Package for CD" feature is unnecessary, since you already have the content in the PowerPoint file.
PowerPoint for the web doesn't support this "packaging" feature, but information technology has other ways for yous to share a finished presentation with others:
-
Save a PowerPoint presentation as a PDF file
-
Salve a local copy of your PowerPoint for the spider web
-
Embed a presentation in a spider web folio or web log

Source: https://support.microsoft.com/en-us/office/package-a-presentation-for-cd-or-usb-flash-drive-ac1ae03e-c5f2-4a0d-8bcb-3c48741117c9
Posted by: hinesableatifes69.blogspot.com
0 Response to "How To Put A Powerpoint On A Usb"
Post a Comment